|
|
| Line 7: |
Line 7: |
|
| |
|
| = Adding Building Sprites = | | = Adding Building Sprites = |
| Note that newly added Sprites must be set to be centered bottom center, so that they will align with all other sprites.
| |
|
| |
| In 'Assets/Scripts/CompanyMap/Master.cs', add | | In 'Assets/Scripts/CompanyMap/Master.cs', add |
|
| |
|
| Line 28: |
Line 26: |
|
| |
|
| Then drag the building images into the newly-created folder. | | Then drag the building images into the newly-created folder. |
| | |
| | Note that newly added Sprites must be set to be centered bottom center, so that they will align with all other sprites. |
|
| |
|
| [[File:040 farmingGameTuroialImages.png|Building Images dragged into 'Assets/Images/CompanyMap/FarmingGame']] | | [[File:040 farmingGameTuroialImages.png|Building Images dragged into 'Assets/Images/CompanyMap/FarmingGame']] |
| Line 37: |
Line 37: |
|
| |
|
| = Adding the Building Type Definitions = | | = Adding the Building Type Definitions = |
| Add
| | Create a 'FarmingGame' folder in 'Assets/Scripts/CompanyMap/Building/BuildingTypes' and create |
| // Farming Game
| | Farmhouse.cs, |
| Farmhouse,
| | Field.cs, |
| Field,
| | ChickenCoop.cs, |
| ChickenCoop,
| | Barn.cs |
| Barn,
| | scrips inside that 'FarmingGame' folder. |
| into the <code>BuildingType</code> enum in 'Assets/Scripts/CompanyMap/Building/Building.cs'
| |
| | |
| [[File:055 farmingGameTuroialBuildingTypes.png]]
| |
| | |
| Then, add
| |
| // --- Farming Game ---
| |
| case BuildingType.Farmhouse: | |
| effects = new Effect[]{
| |
| new Effect<Company>(Owner, (building) => {Owner.Owner.prestige += 100;}),//DEBUG
| |
| };
| |
| slots = new Employee[2];
| |
| break;
| |
| case BuildingType.Field: | |
| effects = new Effect[]{
| |
| new Effect<Company>(Owner, (building) => {Owner.Owner.prestige += 100;}),//DEBUG
| |
| };
| |
| slots = new Employee[2];
| |
| break;
| |
| case BuildingType.ChickenCoop: | |
| effects = new Effect[]{
| |
| new Effect<Company>(Owner, (building) => {Owner.Owner.prestige += 100;}),//DEBUG
| |
| };
| |
| slots = new Employee[2];
| |
| break;
| |
| case BuildingType.Barn: | |
| effects = new Effect[]{
| |
| new Effect<Company>(Owner, (building) => {Owner.Owner.prestige += 100;}),//DEBUG
| |
| };
| |
| slots = new Employee[2];
| |
| break
| |
| to the switch-statement in the <code>SetType</code>-method.
| |
| | |
| The line <code>new Effect<Company>(Owner, (building) => {Owner.Owner.prestige += 100;}),//DEBUG</code> can be replaced by any effect.
| |
| The anonymous function (<code>(building) => {Owner.Owner.prestige += 100;}</code>) in the effect will be executed every tick.
| |
| In this example, 100 prestige will be added to the owner of the owner of this building.
| |
| That is to say that the player owning the company that owns this building will receive 100 prestige per tick.
| |
| Any legal C#-code can be written in this anonymous function.
| |
| | |
| '''Note that effects don't currently work though, and are still subject to change.'''
| |
| | |
| [[File:056 farmingGameTuroialBuildingSetType.png]]
| |
| | |
| Next, in <code>DrawAreaOfEffect</code>, add
| |
| // --- Farming Game ---
| |
| case BuildingType.Farmhouse:
| |
| GetNeighbor(NeighborDirection.NE)?.Highlight(Color.green);//DEBUG
| |
| break;
| |
| case BuildingType.Field:
| |
| GetNeighbor(NeighborDirection.NE)?.Highlight(Color.green);//DEBUG
| |
| break;
| |
| case BuildingType.ChickenCoop:
| |
| GetNeighbor(NeighborDirection.NE)?.Highlight(Color.green);//DEBUG
| |
| break;
| |
| case BuildingType.Barn:
| |
| GetNeighbor(NeighborDirection.NE)?.Highlight(Color.green);//DEBUG
| |
| break
| |
| This is used to indicate to the player what effects the building has.
| |
| In this example, we simply make the north-eastern neighbor green, but the following image has a more elaborate example in <code>case Building.Office</code>.
| |
| | |
| [[File:057 farmingGameTuroialBuildingDrawAOE.png]]
| |
| | |
| Now, we'll add
| |
| // --- Farming Game ---
| |
| case BuildingType.Farmhouse:
| |
| s = Master.Instance.SpriteFarmhouse;
| |
| break;
| |
| case BuildingType.Field:
| |
| s = Master.Instance.SpriteField;
| |
| break;
| |
| case BuildingType.ChickenCoop:
| |
| s = Master.Instance.SpriteChickenCoop;
| |
| break;
| |
| case BuildingType.Barn:
| |
| s = Master.Instance.SpriteBarn;
| |
| break;
| |
| to the <code>SetSpriteByType</code>-method. This simply associates the types we create with the sprites we added earlier.
| |
| | |
| [[File:058 farmingGameTuroialBuildingTypeSprites.png]]
| |
| | |
| Finally, add
| |
| // --- Farming Game ---
| |
| case BuildingType.Farmhouse:
| |
| res += "farmhouse";
| |
| break;
| |
| case BuildingType.Field:
| |
| res += "field";
| |
| break;
| |
| case BuildingType.ChickenCoop:
| |
| res += "chicken_coop";
| |
| break;
| |
| case BuildingType.Barn:
| |
| res += "barn";
| |
| break;
| |
| to the <code>GetTranslationString</code>-method.
| |
| This will be used for adding translations for different languages.
| |
| | |
| [[File:059 farmingGameTuroialBuildingTypeTranslationString.png]]
| |
| | |
| = Creating the Store =
| |
| | |
| In 'Assets/Prefabs/CompanyMap/UI/Store', duplicate (Ctrl+D) the 'ProgrammingGameBuildings.prefab' file and rename it to something more appropriate, e.g. 'FarmGameBuildings'.
| |
| Make sure to rename the newly duplicated file (ProgrammingGameBuildings '''1'''.prefab), not the original one(ProgrammingGameBuildings.prefab).
| |
| | |
| [[File:060 farmingGameTuroialStorePrefabCreation.png]]
| |
| | |
| Now, when you open the prefab (by double-clicking), you should see this:
| |
| | |
| [[File:070 farmingGameTuroialStorePrefab.png]]
| |
| | |
| To associate the item in the store with a building-type, click on it in the hierarchy and set the <code>Building Type</code> in the inspector.
| |
| | |
| <code>Unlock Prestige Level</code> and <code>Preview Level</code> aren't implemented yet, but will be used to determine at what prestige-level the player sees a silhouette/preview of the building and when he is allowed to buy the building.
| |
| | |
| [[File:080 farmingGameTuroialStorePrefabBuildings.png]]
| |
| | |
| Lastly, you'll need to reference the new store-prefab in _Master by adding
| |
| public GameObject PfFarmingGameStore;
| |
| in Master.cs
| |
|
| |
|
| [[File:090 farmingGameTuroialStorePrefabDeclaration.png]] | | [[File:60 addBuildingTypeScripts.png]] |
|
| |
|
| and dragging your store-prefab into that variable-slot in the _Master-inspector.
| | TODO add remaining doc when prerequisites are done |
| | |
| [[File:100 farmingGameTuroialStorePrefabRegistration.png]]
| |
|
| |
|
| = Changing the skin = | | = Changing the skin = |
| | To test your new skin, you'll add |
| | FarmingGame |
| | to the 'GameVersion' enum in 'Assets/Scripts/CompanyMap/Master.cs' |
|
| |
|
| To test your new skin, you'll need to change the line under <code>// Instantiate Store</code> in 'Assets/Scripts/CompanyMap/Master.cs' to
| | [[File:110 farmingGameTutorialGameVersionEnum.PNG]] |
| Instantiate<GameObject>('''PfFarmingGameStore''', GoBuildingStore.transform);
| |
| where ''PfFarmingGameStore'' is the variable we created earlier.
| |
| | |
| [[File:110 farmingGameTuroialStorePrefabInstantiation.png]] | |
| | |
| Now, when you start the game, you can build your new buildings.
| |
| | |
| = Adding building options =
| |
|
| |
|
| Currently, clicking on your newly-added buildings will only pop-up a basic UI pane.
| | Then, select the '_Master' GameObject in the hierarchy and switch the 'Current Game Version' variable in the inspector to 'FarmingGame'. |
| To add specific options for your new buildings, go to the hierarchy and add them under UI/Main/BuildingMenu/SpecificOptionsContainer.
| |
| '''The name of the game-object needs to match the name of the building in the [[#Adding_the_Building_Type_Definitions|BuildingType enum]]''' | |
|
| |
|
| Since we haven't added any real functionality to the buildings yet, simply duplicating and renaming one of the already existing game-objects is enough.
| | [[File:111 farmingGameTutorialCurrentGameVersion.png]] |
|
| |
|
| [[File:115 SpecificBuildingOptions.png]]
| | Now, when you start the game, you should see that your changes have taken effect. |
|
| |
|
| = Localisation = | | = Localisation = |
This page will explain how you would go about implementing a new 'skin' in the game.
Specifically, we will be implementing a farming-themed skin.
Important: Make sure Unity isn't set to compile for 'WebGL Platform'.
To check this, go to your build-settings (File->Build Settings...).
If it is set to WebGL, click on 'Dedicated Server' and press the 'Switch Platform' button in the lower right-hand corner of the window.
Adding Building Sprites
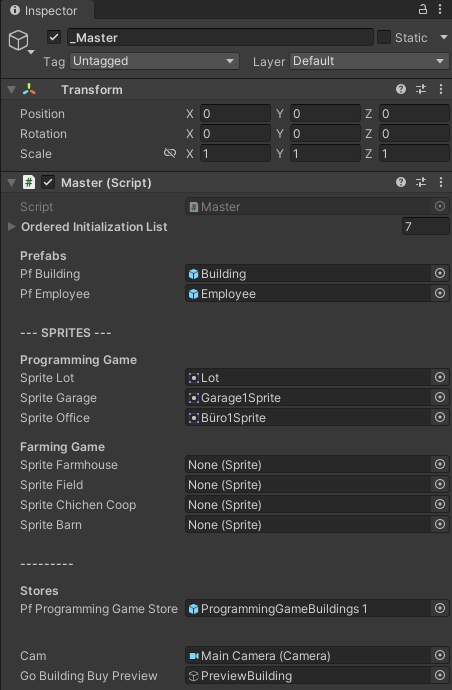
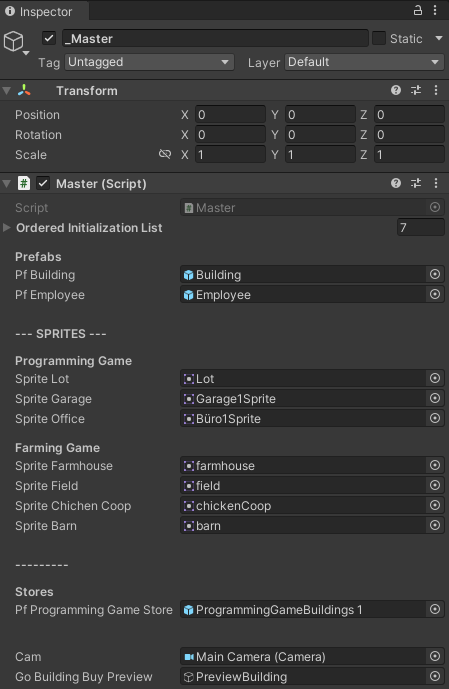
In 'Assets/Scripts/CompanyMap/Master.cs', add
[Header("Farming Game")]
public Sprite SpriteFarmhouse;
public Sprite SpriteField;
public Sprite SpriteChickenCoop;
public Sprite SpriteBarn;

When you now open the 'Assets/Scenes/Pearhub'-scene and click on '_Master' in the Hierarchy, you should see the sprite variables you just added in the Inspector.
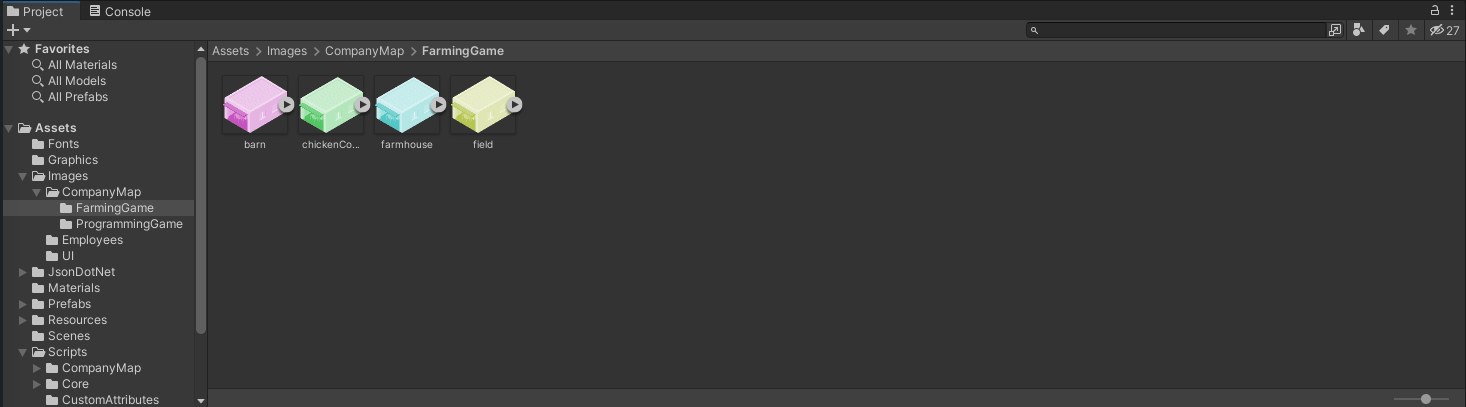
Now create a new folder in 'Assets/Images/CompanyMap' and name it according to the skin you are creating. Since we are creating a farming-themed skin, we will be naming the folder 'FarmingGame'.
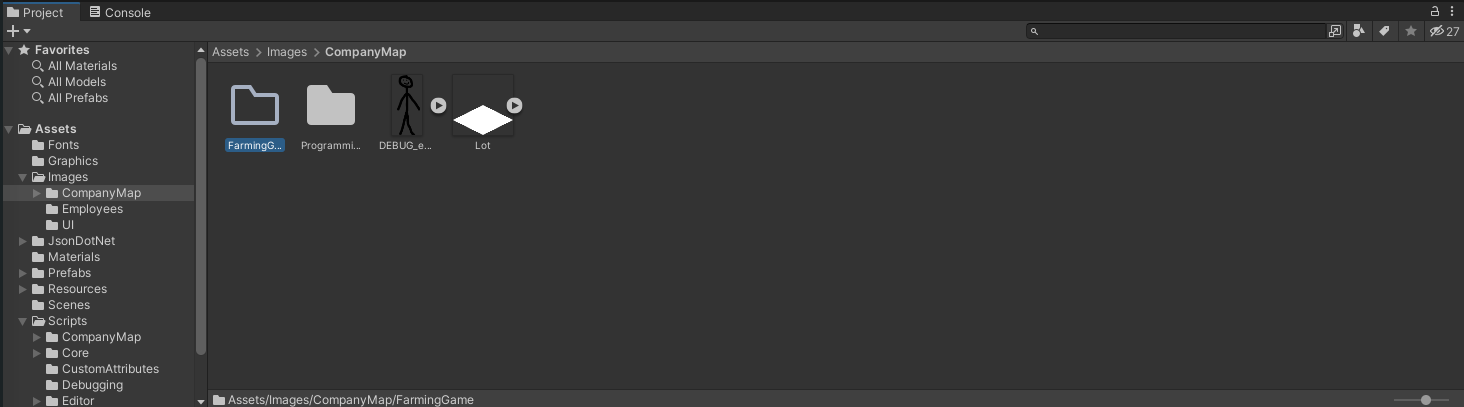
Then drag the building images into the newly-created folder.
Note that newly added Sprites must be set to be centered bottom center, so that they will align with all other sprites.
After the images have been added to the project, drag the images into their respective variable-slots in the Inspector of _Master.
Note that, if you're using SVGs, you will need to click on the arrow to the right of the image and drag the sprite-file instead of the SVG-file.
Adding the Building Type Definitions
Create a 'FarmingGame' folder in 'Assets/Scripts/CompanyMap/Building/BuildingTypes' and create
Farmhouse.cs,
Field.cs,
ChickenCoop.cs,
Barn.cs
scrips inside that 'FarmingGame' folder.

TODO add remaining doc when prerequisites are done
Changing the skin
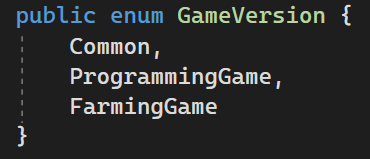
To test your new skin, you'll add
FarmingGame
to the 'GameVersion' enum in 'Assets/Scripts/CompanyMap/Master.cs'
Then, select the '_Master' GameObject in the hierarchy and switch the 'Current Game Version' variable in the inspector to 'FarmingGame'.
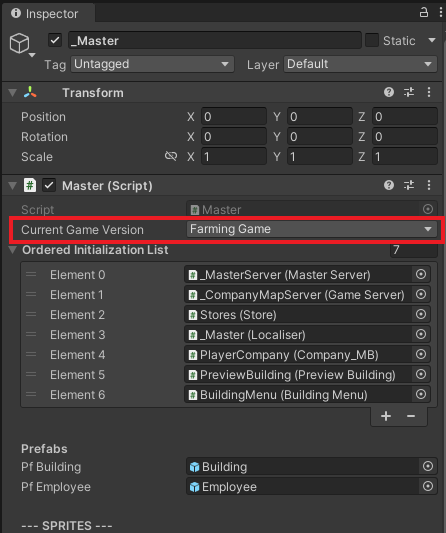
Now, when you start the game, you should see that your changes have taken effect.
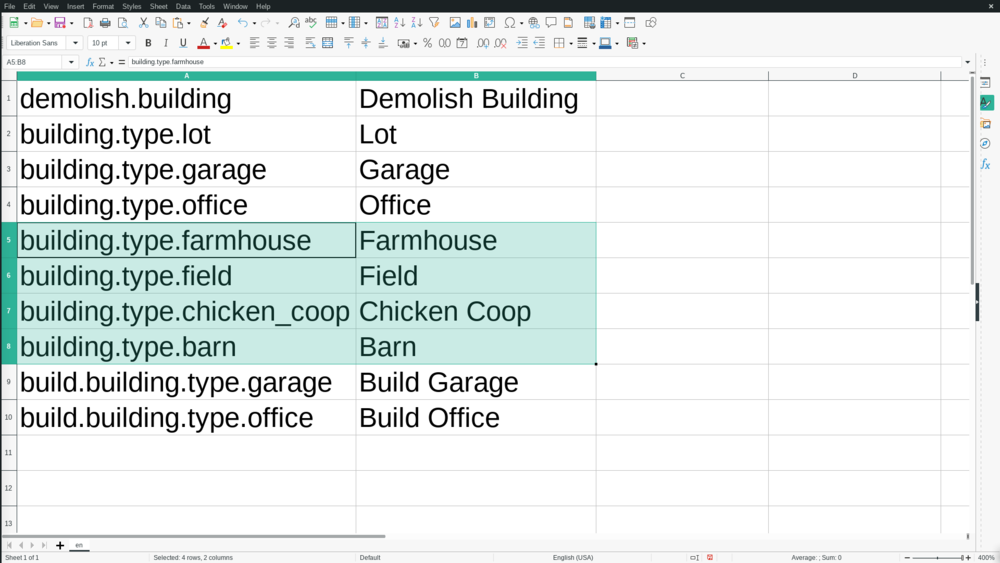
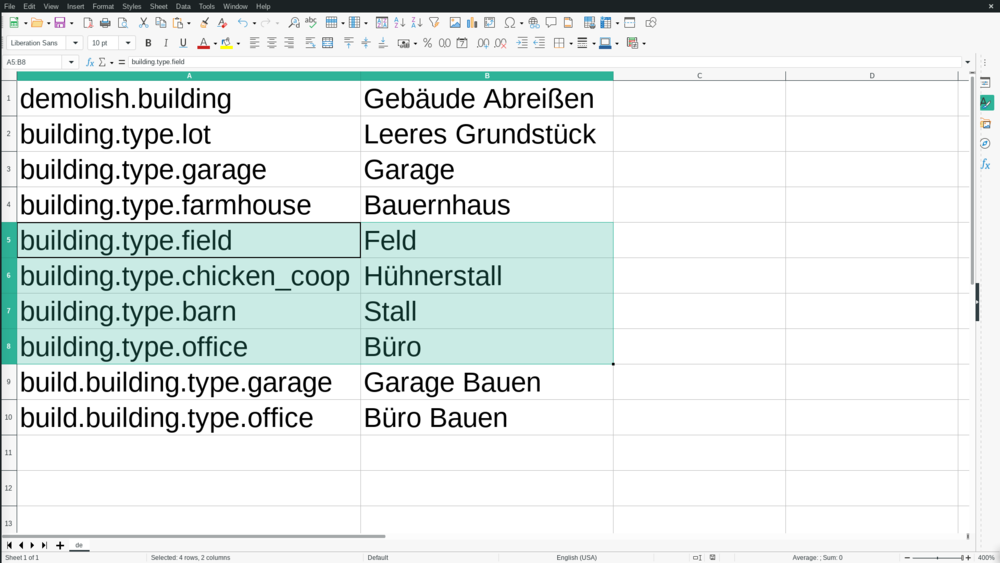
Localisation
Currently, the labels of the buildings in the store still print the translation-string.
To change this, we'll need to add translations for the languages we want to support.
Go to 'Assets/Resources/localisation' and right-click on a file, then open it in your file-browser (Explorer in Windows).
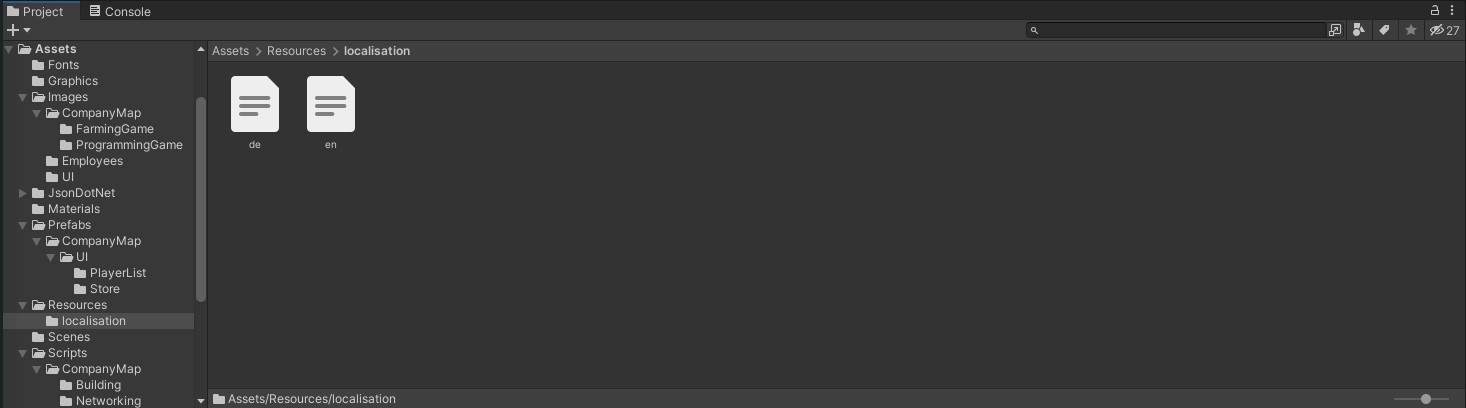
Your file-browser will open.
Now, click right-click on the language-file you want to edit and open it with a Spreadsheet-editor (e.g. LibreOffice Calc, Microsoft Excel).
If asked, set the separator to 'Semicolon' (;).
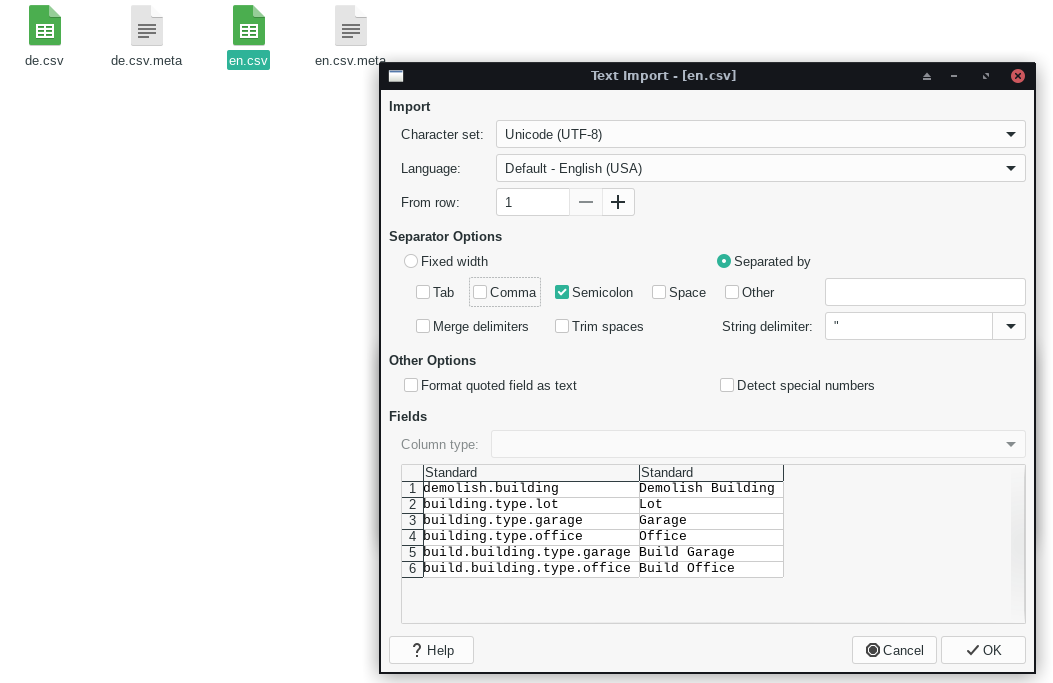
Add the translation-strings of the buildings you created in the first column and their translation in the second column.
You can add the rows anywhere you like, though it might be a good idea to keep the localisation-files organised.